Friday, January 27, 2012

Resuming work

We had intended to take a five-day break awhile back, for my son's wedding.  This was followed, unfortunately, by an unintended seven-day break due to a death in the family.  After catching up on a lot of non-Vanagon tasks that built up during our absences, I've re-started work.  First up, put what new parts I have back onto the shift linkage:
New boots and bushing, ready for the shift lever on the left end.  I'm going to put this in last, since there's a chance the new shift lever will arrive next week, and having the shift linkage uninstalled won't prevent us from starting the engine and checking it out.
Next, we put in a new fuel line for the pump-to-engine run.  I bought enough fuel line to replace both the feed and return sides, but the return side is connected to the fuel tank on the top of the tank, which can only be reached if the tank is dropped.  We know there's a vapor leak in the rat's nest of tubing on the top of the tank, but it's not in the return line, and since it operates at a lower pressure than the feed line, I'm going to wait until spring to renew it.  I will need to drain and lower the gas tank to fix the leak and replace the line, and it's better to do this outside (in a blowing wind), since it will involve spilling gasoline.
Here's a shot of the attachment of the return line to the new fuel pressure regulator, which is the item visible in the center - the hose attachment is at the bottom, feeding through the corrugated protector.  I had to use a temporary clamp, since the kit came with only two fuel hose clamps, which I used on the feed line:
Attached to the outlet of the fuel filter.  The original installation used lots of Oetiker clamps, which are really best for this application.  I may spring for an Oetiker kit someday and re-do these.
Here's the feed line running up the back of the firewall.  The original line was clamped to the brake distribution block with a special hose clamp.  It happened that I had a perfectly sized new hose clamp that worked with the new hose and the old bolt:
Routing the new hose over the top of the transmission bay and through the old hole that housed the old line, I added extra abrasion protection, tied the line with zip ties to the back of the engine bay, then trimmed and attached it to the new fuel rail input.  Tomorrow, I'll start installing the new wiring harness, and if I can get a couple of additional fuel hose clamps, finish the return line.

Monday, January 16, 2012

Detour to the Shift Linkage

Pulled out the shift linkage, which has been prone to stick in fourth gear after long stretches on the highway.  Here's the joint between the shaft attached to the shift lever and the part that reaches back to the transmission:
I've put masking tape and a mark on the shaft, because the setting of the various parts is critical.  There's a many-step process to go through in order to re-set the length and orientation of the shaft, and this tape will allow me to skip that.
Removed and sitting in the shop, you can see the new boots and what's left of the old ones.  The piece on the right-side end is called a "shift lever" and is upside-down in this shot.  When installed, it sits upright, with a nylon ball fitting inside the cup (which is pointing down in the photo).  There is a boot that covers the cup/ball assembly, but that had split.  Due to the design, any leakage of the shift lever boot allows moisture to accumulate in the cup, which is made of pot metal, and corrodes easily.  I couldn't get a shot that does justice to the pits inside this shift lever.  The design seems destined to have problems.  So, in the future, I will check this regularly after I install the new shift lever - !@#*&^ 55 more dollars - which won't arrive until February.  Until then, I'll re-install the old lever, with the interior polished as best I can, which will make a looser fit with the plastic ball (itself worn and being replaced), but it should be OK for testing the new engine.
If you have a manual trans with this arrangement, I'd carefully check the boot now and annually.

Wednesday, January 11, 2012

The engine's in, and we move on

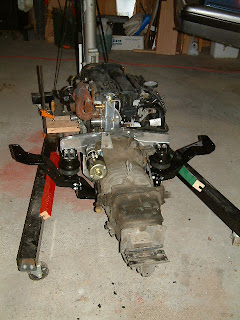
I worked on and off through the weekend, and got the engine in.  I have few photos for this segment, since taking photos (myself) involves cleaning up my hands before using the camera, which adds considerably to the time involved in any of the tasks.  Nevertheless, here's a photo of the engine, ready to roll back under the vanagon:
The two nicely colored blocks were left over from a wood project and were exactly the size needed.  This arrangement allowed the assembly to roll on the hoist arms, clearing the floor by about one-half inch, leaving lots of room above as it went under the van:
Here we are, inside at last.  At this point, I lowered the van considerably, since I didn't need it as high as it was after I got the engine under the bumper. 
For the actual raising of the engine to attach the mounts (the front mount that holds the transmission, and the two sides of the new black steel engine cradle), you'll have to use your imagination, since I didn't use the camera.  Essentially, it involved a large number of trips under the van, back out to the hoist jack to slightly raise or lower the engine, work the engine slightly forward or rearward, back under to work the CV joints into position, more fiddling, etc.  The front mount gets loosely attached first, then the rear of the engine is raised until the CV joints can be attached with a couple of bolts on both sides, then final raising, fixing bolts (one on each side has to be drilled, in addition to two on each side that fit pre-made holes).  It was all complete on Monday afternoon, at which point I took a break to give my arms a rest.
Tuesday (yesterday) I added the exhaust system (kit SK-E, see part of it above), and went through most of the intake system (SK-I), stopping at the point where I need to install the new fuel lines.  These should arrive tomorrow (Thursday), so today I will probably, if I have time, remove the rear part of the shift linkage and install the new shift boots and bushing.  Here's the engine side of the modified intake system, showing the milled adapter that holds the throttle body, which in turn is attached to a LONG ribbed intake hose that goes all the way around to the passenger-side taillight area.

For those who may have wondered, the white marks on the cam cover are from battery acid that apparently squirted out of the battery when it got crushed in the accident that totalled the Focus that the engine came from . . .

Back to non-Vanagon work for awhile.

Friday, January 6, 2012

One step at a time

Well, the starter was in.  I picked it up late in the morning, and got back around noon.  Trembling with anticipation, I lifted it out of the box, and to my delight, found this:
And they mean IN THE BELL HOUSING, in a hole which is open on both ends when the transmission is off, but deep inside a blind hole when it's attached.  Of course, you can extract and replace the bushing while the transmission is attached to the engine, using special tools VW9999xx and VW6666bs, etc.  I, of course, don't have these tools, and couldn't purchase them to use just one time.  Do I really need to replace this bushing?  The message is pretty grim, of course - what do they care how hard it is to replace?  The existing bushing looked, as far as I could see, okay.  I thought about it awhile, then decided that I'd gone this far, no good reason to jeopardize the new starter I'd paid so much for.  So, the alternative is to remove the transmission, again, and drift out the old bushing from the back of the bell housing towards the inside.  Here's the old bushing after I pulled the trans (the shiny thing in the center is the bushing):
Doesn't look in bad shape . . .  But I pushed it out with a drift, and put the new bushing in, using an almost equal-diameter bolt as a driver.  No problem, nice and neat:
And, best of all, the old bushing really WAS in bad shape:
There are stress cracks, too, that don't show up in this low-res pic.  Plus, it was a very loose fit on the new starter drive shaft.  So, I felt better about deciding to pull the trans.  I felt great when I was able to re-fit the transmission, all by myself, in almost half the time it took the last round.  While this was satisfying, I really don't want to have a third opportunity to improve my skills with this. 
Tomorrow:  the whole thing goes under the van.

Waiting on the starter

We've connected the trans to the new engine:
This turned out to be relatively simple, since the engine hoist had an optional adjustable leveling accessory that could be cranked back and forth to adjust the front/back angle of the engine.  After lining up the engine to the transmission (blocked level on a handcart), I had Joan hold the engine steady while I moved the trans onto the engine studs by pushing on the cart.  The fit of the bell housing wasn't as tight as I had feared, and now we wait for the replacement starter, due today (Friday):

While it looks bad, it seems fully functional.  However, I'd have to take it apart to see how badly worn the brushes are after 21 years, and since its location is MUCH easier to reach with the transmission out than when it's in, I think a preventive replacement is a good idea. 
I've measured the clearance below the current height of the back of the van, and have more than enough room to get the engine/transmission back underneath, but it will require some thought whether to try to push it under on the arms of the transmission hoist (as the old engine was when it came out), or knock together some sort of slide to push it on.
In the meantime, I've completed the modification of the stock airbox, and installed the new chipset into the salvaged engine control computer.  Also, we have on order three new rubber boots and one new bushing for the shift linkage, since the old boots are nothing more than a broken series of rubber rings.  Replacing them will allow a newly-greased linkage to work better, I hope.

Sunday, January 1, 2012

It's a New Year, but the same old Vanagon

The blue bus has seen many New Years.  Anyway, I have ordered the new starter (. . . gulp . . . $150), but after the alternator fiasco and the one-foot-in-the-grave release bearing it seems the only rational thing to do.  I hope this is the last financial hurdle we have to leap before this project is done.
I have removed the old starter, which is worth $20 as a core trade-in on the new (actually, rebuilt) starter.  The new starter is due in, at latest, next Friday (1/6/!2012!).  So in the meantime, I will mate the trans and engine, drag both of these underneath the van, and ready them for installation.  I will also have to separate the power steering pump from its hoses.  The Bostig instructions and video have this step as part of removing the engine.  I decided, instead, to un-bolt the PS pump and wire it to the sidewall until after I got the engine out.  I had two reasons for this:  1)  No matter how it's done, disconnecting the PS pump will result in spilled oil, which will be easier to catch and clean up if it's done after the engine is out of the way;  2)   I can hold the PS pump higher than its reservoir tank as I disconnect the hoses, and then cap the hoses and reduce the amount of leakage.  Clever, huh?  I'll let you know if it actually works better that way.
I have also decided to renew the boots on the transmission shaft.  These are inexpensive (comparatively!), and combined with a cleaning and re-lubricating of the shift linkage, should improve the feel of the shift linkage.  It's probably the last time I'll have access to new parts for this stuff, too.  The digrams in the Bentley manual for VW don't show clearly how the shift linkage comes apart, but I perceive a couple of likely methods, and unless one of them destroys the linkage, you'll only hear about how well it went.
Fly-in-the-ointment time, though.   After many misleading days of moderate temperatures, it's now forecast to be in the upper 20's (F, for my Canadian friends) Monday through Wednesday.  Except for nights, which are set to be 13 on Tuesday morning, 10 on Wednesday.  I may have a hard time warming up the work area.