Saturday, December 31, 2011
No progress lately
Just got back from a two-day round trip to Granville, Ohio. I've decided to replace the starter motor if I can get a reasonable quote for a rebuilt one. That will delay the project slightly - how much, I'll know later today, I think.
Thursday, December 29, 2011
Halfway to installing the new engine
Here's the old engine with the transmission, pressure plate, and clutch disk removed. It was pretty difficult to separate the transmission from the engine, due to a very tight fit plus a small amount of corrosion, but a little penetrating oil plus a lot of careful tapping got it done:
Once the transmission was removed, I removed the old release bearing. This was one part that was about to fail - completely dry, and just starting to get noisy. Maybe this starts to compensate for the alternator debacle.
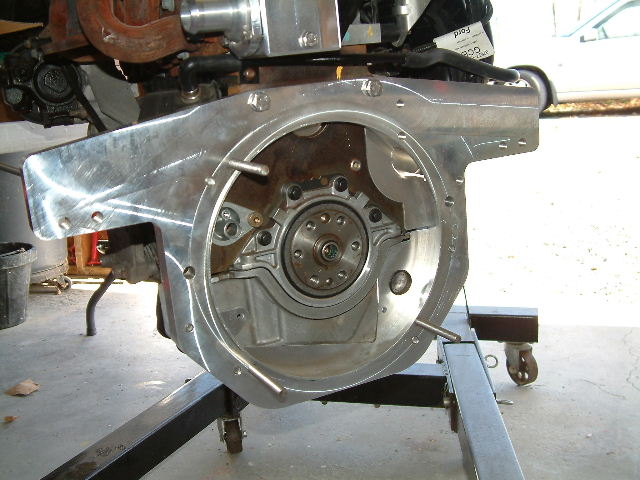
Just in case you forgot what it looks like, here's the transmission on the cart, ready for the new release bearing:
 That starter motor looks pretty tired. I need to look up what it costs to replace it and decide if it's worth it. It would be a lot easier, of course, to do it now, but I'm trying to limit additional spending.
Next, since I've moved the three small pins from the old flywheel to the new, we mount the pressure plate and clutch disk to the new engine's flywheel:
 I bought a complete clutch "kit," which includes, according to its description, a pressure plate, friction disk, and release bearing. I also bought an alignment tool, since you need one to center the disk ($2.95). I was a little peeved to find, packed inside the kit, both an alignment tool and a new pilot bearing. So, now I have both of these and hope that I can find someone who can use them. I hope never to need to replace the clutch parts again (the old friction disk was about 75% worn, so it may have lasted for another 75K miles).

 Torqued all fasteners to spec, and ready to mount the transmission. That will be a wrestling match to be documented in the next post.
 |
| Ready to store in the barn, until I get around to selling or recycling it. |
Just in case you forgot what it looks like, here's the transmission on the cart, ready for the new release bearing:

Next, since I've moved the three small pins from the old flywheel to the new, we mount the pressure plate and clutch disk to the new engine's flywheel:

The new release bearing is mounted in the cleaned-up bell housing of the transmission:

The release shaft above the bearing looks clean because it is. For years I've wanted to get to it somehow and lube it, because it seemed that the clutch action was stiff. It wasn't easy, but I was able to free the inside circlip, then pull the shaft to the left and clean both the shaft and its bushings. Added new grease (you can see some of the red grease on the right), replace the seals and circlip, and it's now smooth and quiet. This is one of those tasks that needs to be done while the parts are accessible (there will be many more, I think), but adds an hour or so each time to the project timeline.
I may elaborate on this later (it took quite awhile), but in summary, I next assembled the new engine cradle and attached it to the engine as instructed:

Tuesday, December 27, 2011
Engine is out
Finally - the engine is dropped and out:

All we'll re-use is the transmission, on the left. The new Zetec is behind the old engine. Quite a contrast - tall and thin, vs the flat boxer. It's a shame I can't do what BMW did with their K-series in-line fours on their motorcycles. They laid them flat on their sides, earning the nickname "flying brick" for the series. However, a motor not designed to run on its side wouldn't like it at all.
Turned out that I mis-counted the bolts on the CV joints. There were only six, and I could get to three at a time, so I was able to remove both without enlisting any aid.
The engine/transmission assembly is mostly resting on the engine hoist, but the transmission end is dragging on the floor. I'll need to put together another wooden cradle to enable removal of the transmission. Then, removal of the old clutch (to retrieve two (2) pins on the old flywheel!) Then, the serious stuff of installing the conversion parts. Here's a final shot of the now-empty engine compartment:

That's the garage floor down there.
More to come.
Ready to pull the old engine
Yesterday I spent about 4 hours finishing the preparation for removing the old engine. This included disconnecting additional hoses, plugs, and so forth, and pulling out the old engine control wiring harness. I have only to uncouple the CV joints:
which shouldn't be too hard, since the eight bolts holding each one are coated with a thin layer of grease that keeps them from rusting - unlike almost every other bolt I had to work with so far. I may need a helper to set and release the parking brake, since the bolts are easy to reach when they're at the top of the joint, which means I can turn the shaft, set the brake, loosen the bolt on the top, then release the brake and repeat.
After the joints are free, I'll do a final check for attached things, then set the jack (front of transmission) and the engine hoist (rear of engine), and release the mounts. Then, it's a two-person operation to ease the two down to the floor, and drag 'em out.
Here's the pile of things removed. The ganglia-like cable at the left is the engine-control system harness. There are some parts in this pile (the heat shields) that will be reused, but the rest will either get eBay'd or trashed. There are still a lot of hoses and wires attached to the engine, which will come out with it and not get re-used, either (see last photo).

 |
| Passenger-side CV joint |
After the joints are free, I'll do a final check for attached things, then set the jack (front of transmission) and the engine hoist (rear of engine), and release the mounts. Then, it's a two-person operation to ease the two down to the floor, and drag 'em out.
Here's the pile of things removed. The ganglia-like cable at the left is the engine-control system harness. There are some parts in this pile (the heat shields) that will be reused, but the rest will either get eBay'd or trashed. There are still a lot of hoses and wires attached to the engine, which will come out with it and not get re-used, either (see last photo).

I had enough time yesterday to drop the engine, but I was home alone until about 1:00, when I left to donate blood. I didn't want to get into heavy wrenching when I got back, so I decided to wait until today to finish. Today it's raining and cold, which pretty much leaves indoor projects only on the to-do list.
 |
| Much remains attached to the engine itself |
Wednesday, December 21, 2011
Progress is Made
So, it's Wednesday, and we've moved ahead on removing the old engine. Step one: drain the coolant. Bostig's video shows them enthusiatically vacuuming out the coolant with a shop vac. I have a shop vac, but I also have a shop - a wood shop, and I suspected that using my wet-dry vac on coolant would at least cost me a filter, and maybe leave enough residue in the vac and hose to render it useless for vacuuming sawdust. So, I decided on an alternative:

I placed a cheap sprayer tank between the vac and the coolant, using a vinyl hose to suck the coolant into the sprayer tank, before it got to the vac. As you can see, this three-gallon sprayer is almost full. The Vanagon holds LOTS of coolant, and I know I didn't get it all. To do that, I would need to open drain plugs on the cylinder heads. They're covered by shrouds that are held by bolts that are rusted thoroughly in place, so I'm going to have to live with spilled coolant before this is done. Not much, though.
Before I started anything, I had to disconnect the battery. Simple job - just remove the grounding strap. The battery is easily accessible under the passenger seat. BUT:
 Well, what's the radio doing there?
The Heidelberg radio was considered so valuable (by its manufacturer) that it was made with a locking function that takes hold if the radio is disconnected for more than a few minutes. To remove the lock, you enter a security code that is provided with your vehicle. However, we've long lost the code. VW says they no longer have it on file (I checked). There is at least one website that claims it will provide the code for $25, but I see that as a last resort. What you see above is the radio, removed, and attached directly to the battery, so that it believes that it's not stolen and won't engage its lock. Glad I'm smarter than the radio.
Here's a lineup of removed component parts as of today (not including the *&^$* new alternator):

I'm not sure what to do with the A/C compressor (at right). I think it's probably worthless. The other stuff may be eBay-able.
Finally, a shot of the engine minus its accessories, and with a lot of stuff disconnected:

It's pretty messy-looking, isn't it? You wouldn't believe how many hoses and clamps are in this vehicle.
More action tomorrow (thurs) afternoon.
Monday, December 19, 2011
Resuming the Project
I'm posting this instead of starting immediately, since it's 22 degrees(F) in the garage right now, with a forecast of 50 later today. I need to put the van back in the garage, sideways, as I had it last month. This requires moving all the motorcycles out, clearing the path to the back of the garage, then carefully backing the van in and getting it in exactly the right position. Should be easier the second time.
The trip to Oklahoma and back was almost uneventful. On the way back, about 4 hours into the trip, I noticed a very faint and intermittent flickering of the charge indicator light. Once we got into darkness, it was clearer that the light was, indeed, flickering now and then, and it seemed that the headlights weren't as bright as normal. We stopped a bit early, and decided to start early the next day (Saturday), and try to drive the greatest distance possible in daylight. After starting off at 4:30 am (CST), we got two miles down I-40 and the van engine slowly quit. Got it parked off the shoulder, and a couple of checks showed that we had no charging system. Having had something similar happen to our Diesel after 180K miles, and knowing that the charging light is in series with the field of the alternator, I suspected that, once again, I had an alternator with worn-out field brushes. Knowing this was no help to getting us started, of course. We walked about 3 miles from the van to a McDonalds that had opened at 5:00 a.m., and began working on getting a mechanic. We had plenty of help from the Saturday morning regulars in the Mac, but more useful information from the night manager, who pointed us at the service station that eventually (9:00 a.m.) got us back out to the van, and verified that we had no alternator output. With a jumper battery, we drove the van to the service station, and started waiting. I had already had time to confirm with Autozone that the brushes (which are integral with the voltage regulator, and an easy two-screw replacement) were no longer offered as a separate part. So, with a brand-new alternator sitting in the garage back home, we had to install a rebuilt alternator in order to drive about 21 hours back home. After it was removed, I confirmed that the old alternator did actually have a brush problem: one of the two brushe's connecting wires had parted, and was probably making intermittent contact (thus the blinking light).
Driving the van from Fort Smith (AR) home in one drive - 18 hours total - we got the full picture of the van's strengths and weaknesses for this kind of trip.
Plus: power is good when it's empty, it drives and tracks pretty well for a big box, it has the great double bed in back for the non-driving partner to sack out on, and the passenger can walk around in it while you drive, in case you need to reach *anything* you've put into it. Try that with a sedan or station wagon.
Minus: the pavement in parts of Arkansas and Oklahoma is miserable, and sitting directly over the front wheels, the front seats get hammered when you hit bumps or washboard. The gas mileage is not great - we got 21+ at 65 mph. This brings up a need that I don't think I will ever satisfy: a lower ratio fourth gear, or even better, a five-speed trans. On flat roads, the boxer's 90hp is more than enough for this Transporter model (though probably only adequate for a full camper). At 65 indicated, we run 3600rpm, which isn't screaming, but I think the fuel mileage would be better with a few hundred rpm knocked off the top gear, even at the cost of downshifting for hills.
We still love it, and now we'll get a new(er) engine in it and see what that does to its personality. It did fine over this last 2500 mile trip, but I'm glad we're moving to reduce the uncertainty regarding the old engine and its related accessories - water pump, power steering, etc.
Tuesday, December 6, 2011
Another hiatus
Since it's been almost a month since the last post, some folks were wondering if I'd finished the project without blogging it. Well, rest assured, the odyssey will still take place on line. What happened is that I took up a couple of other projects that needed to be completed either outdoors or by an end-of-November deadline. The deadline project was to construct a futon couch/bed for my daughter for Christmas, and it had to be done before we went to Oklahoma to visit her. This project required one-inch thick oak, which we ended up having to buy in Springfield, Virginia and cart back here to WV. From two huge 14 foot boards, I completed the following:
 It's an oil finish, and we're marinating in the fumes as it dries in preparation for the trip.
I have everything ready, still, for the engine conversion. I should be continuing on it starting the week of December 19. This means that I'll be working in a cold garage, but I have a convenient propane heater that provides safe and reliable heat for those working on gasoline-fueled engines. Or, maybe not safe. Anyway, this week it's vacuum the Vanagon, load it for the trip, and take off. We generally have not done long trips in the van, but it's not because it's uncomfortable. As a matter of fact, the daring can sleep in the bed in back while someone else drives, though I've never been able to sleep well when we're moving. Also, it doesn't have cruise control, and if there are crosswinds, it's pretty much a sailboat on flat roads. All in all, though, I'm looking forward to a long cruise that's not in our V70, nor on a motorcycle. This trip should remind us of why we're doing this conversion.

I have everything ready, still, for the engine conversion. I should be continuing on it starting the week of December 19. This means that I'll be working in a cold garage, but I have a convenient propane heater that provides safe and reliable heat for those working on gasoline-fueled engines. Or, maybe not safe. Anyway, this week it's vacuum the Vanagon, load it for the trip, and take off. We generally have not done long trips in the van, but it's not because it's uncomfortable. As a matter of fact, the daring can sleep in the bed in back while someone else drives, though I've never been able to sleep well when we're moving. Also, it doesn't have cruise control, and if there are crosswinds, it's pretty much a sailboat on flat roads. All in all, though, I'm looking forward to a long cruise that's not in our V70, nor on a motorcycle. This trip should remind us of why we're doing this conversion.
Tuesday, November 8, 2011
Moving ahead again.
Last week was spent mostly in completing a ceiling repair/repaint job for the gentleman who is lending me his engine hoist. I was stuck in Adapter, since I needed to cut off a portion of the subcrankcase, but couldn't do that until I had the means of suspending the engine.


Got the hoist yesterday, and raised the engine. The instructions say to apply the custom shims and the adapter plate (a heavy aluminum CNC piece), then mark the crankcase and cut off the portion below the shim/adapter. I foresaw that once I had mounted the adapter onto the locating pins, the fit was going to be too tight to allow easy removal of the adapter, and I didn't want to cut with it in place. So, I marked the line by using the shim, and clamped on a guide (piece of lath) for the cut.

After the cut
The actual cutting of the soft aluminum was not as easy as you'd think. I had a hacksaw, a Sawzall, a sabre saw, and a rotary grinder. The problem with cutting aluminum with a reciprocating blade is that it's easy to heat the teeth in the cut, at which point they fuse to the aluminum chips, get hotter, clog more, etc. I was able to complete the rough cut with the Sawzall and a coarse blade, using very little pressure and moderate blade speed, and clean it up with the grinder. At one point I tried the hacksaw, since I figured it wouldn't clog, but the rate of cut was almost zero, and I couldn't brace the engine well enough to work hard at it. I think the best tool for this would have been a hand-held bandsaw, using a blade lubricant.
Next, we mount the adapter:
In the photo above, the transmission studs have also been threaded in. I used a very large C-clamp to press the adapter onto the locating studs - the fit was extremely tight, and I hope I never have to remove it.

Above, the pilot bearing after driving it into the crankshaft socket. Next, the flywheel. The final steps in the instructions for the Adapter kit involve mounting the clutch disk and pressure plate, using parts from the old engine. Since I haven't removed the old engine yet, that section will get a yellow "TO DO" tag, and we'll move on to the Mounting kit. I can't go too far with the Mounting kit before I will need to have the old engine out, so I'm going to review the engine removal instructions and video and make a decision on moving ahead with that.
 The final steps in the instructions for the Adapter kit involve mounting the clutch disk and pressure plate, using parts from the old engine. Since I haven't removed the old engine yet, that section will get a yellow "TO DO" tag, and we'll move on to the Mounting kit. I can't go too far with the Mounting kit before I will need to have the old engine out, so I'm going to review the engine removal instructions and video and make a decision on moving ahead with that.
Monday, October 31, 2011
Where've you been?
In bed with a cold/flu. Got out on Sunday, though weak, and re-arranged the garage for work. Put the van in sideways, so there's room above it to raise the rear end, and then laid out all the kit boxes on tables, ready to go. I skipped SK-A (adapter) for now, and went to kit C (cooling), since I don't have an engine hoist yet. SK-A requires some cutting at the bottom of the engine, which I can't do unless I suspend the engine somehow. I should be able to pick up the loaner this week.


 Below are: SK-C parts (the two O-rings are Ford OEM, since the engine came without the PLASTIC thermostat housing - almost $20 for the two of them!!), the thermostat, drilled with a 1/8" bleed hole per instructions, and the assembled thermostat housing. The housing is a beautiful billet CNC-milled aluminum chunk, with chamfered edges to boot. The last photo, poorly exposed, is the housing mounted to the engine. Next, I'll either go back to SK-A, or start raising the van and draining things.
Saturday, October 22, 2011

Friday, October 21, 2011
The alternatives
The alternative of disposing of the van was the last option. It's in excellent shape for its age (aside from the engine), with good paint, good interior, no rust, and (with all due humility) well-maintained. Its only problem has been recurring issues with the engine cooling, and the failure of the air conditioning due to a leaky compressor. Parts for the engine are getting scarce, though there are many available on the specialized Vanagon sites to help with this.
I looked at various engine alternatives, not including re-building the existing engine. Subaru, TDI, other engines have all been retrofitted to the van by various individuals and small companies. I was primarily interested in an upgrade that would replace the existing engine with one that would be easy to install and support. I had no interest in significantly increasing the power level, which has been reasonably adequate at the stock 90hp, though marginal with the A/C turned on.
I decided to go with the kit and support provided by Boston engineering firm Bostig Incorporated (www.bostig.com). While the total cost of any conversion seems high in comparison to the age of this vehicle, the design, support and materials they supply are first-rate, and the choice of a Ford Zetec, a reliable and high-volume engine, seems ideal for the owner wanting to move the motive technology of the Vanagon ahead a decade or so. One gains 35 - 40 hp, we can revive our air conditioning with a reliable compressor, the exhaust system is simplified, and the engine management system allows full diagnostic capabilities. The kit includes all the custom parts necessary to install the non-standard engine, and full documentation and support are available every day. So, choice made. Away we go.
Project Background
This will be a history of my project to convert our Vanagon from its stock engine to a new (used) Ford Zetec four-cylinder in-line engine. Why? Well, my association with Volkswagen's water-cooled engines consists of three efforts: a 1980 Volvo diesel engine (by VW/Audi), a 1982 VW Rabbit convertible, and this 1990 Vanagon. The diesel cooling was acceptable - it just leaked oil. The Rabbit was a Rube Goldberg nest of hoses, pipes and several dozen joints that constantly loosened, cracked, and leaked coolant. A friend of mine once identified the year of my Rabbit, in the dark, by the smell of hot coolant that always surrounded it when parked. The Vanagon? It's barfed out its water jacket gaskets three times. First time, replaced under warranty. Second time, some pity, but they only paid for parts. Third time, we paid the whole thing. This job, not done by the dealer, seemed to last - over ten years so far - but when I saw the green puddle on the floor a few months ago, and added the cost of a complete new exhaust system that it would need to pass inspection, the hunt was on for an alternative.
Subscribe to:
Comments (Atom)